

Recall captures encrypted snapshots of a user’s screen activity, allowing for quick, protected access to previously viewed content. Although this helps trace the pages viewed by end-users, it can break an environment’s privacy, compliance, and local storage policies.
If you’re looking to delete Windows Recall snapshots, you’re in the right place. Read on, and we’ll show you different Recall management methods, along with associated risks and key considerations.
Methods to delete Recall Snapshots in Windows 11
Enabling Recall provides users with timeline-based screen history, helping them revisit previously accessed pages that appeared on their screen. This feature can benefit many users, from students revisiting past research to admins backtracking errors they’ve encountered while troubleshooting endpoints.
However, having screen snapshots can violate compliance management policies within environments that work with sensitive data. Additionally, since this feature actively takes snapshots, it can bloat storage, reducing available free space for users.
That said, it’s important to configure the Recall feature to help it align with your organization’s needs and goals. To ensure a smooth configuration of this setting, verify that your target system meets the requirements below.
📌 Prerequisites:
- Windows April 25, 2025 update (KB5055627) or later
- Windows Copilot+ PC
📌 Recommended deployment strategies:
Click to Choose a Method | 💻 Best for Individual Users | 💻💻💻 Best for Enterprises |
| Method 1: Delete Windows Recall snapshots via Settings | ✓ | |
| Method 2: Delete Windows Recall snapshots from a specific timeframe | ✓ | |
| Method 3: Adjust maximum storage duration for Recall snapshots | ✓ | |
| Method 4: Manage Windows Recall using the Local Group Policy Editor | ✓ | ✓ |
Method 1: Delete Windows Recall snapshots via Settings
Recall snapshots can potentially consume a huge chunk of disk space when left unmanaged. By deleting all snapshots, users can free up space and clear any sensitive information saved on their devices.
📌 Use Case: This method is ideal for clearing all Windows Recall snapshots saved within a user’s account.
- Press Win + I to open the Windows Settings app.
- Select Privacy & Security on the left, and click Recall & snapshots on the right.
- Find Delete snapshots and expand it by pressing the chevron symbol (v) beside it.
- Inside the dropdown, press the Delete all button beside Delete all snapshots.
- Confirm the deletion process when prompted.
⚠️ Important: All locally saved snapshots are permanently removed from a user account when deleted. (See ⚠️ Things to look out for.)
Method 2: Delete Windows Recall snapshots from a specific timeframe
If you need a finer approach for deleting Recall snapshots, you can opt to select snapshots from a specific timeframe. This method allows users to pick which snapshots to delete without losing everything in their Recall history.
📌 Use Case: Leverage this method if you want to target specific Recall snapshots for removal.
- Press Win + I to launch the Windows Settings app.
- Choose Privacy & Security and then press Recall & snapshots.
- Expand Delete snapshots by pressing the chevron symbol beside it.
- Find Delete snapshots from a specific timeframe and pick the timeframe containing your target snapshots:
- Past hour
- Past 24 hours
- Past 7 days
- Past 30 days
- Click Delete snapshots and confirm the deletion process when prompted.
Method 3: Adjust maximum storage duration for Recall snapshots
You can set Recall to automatically delete snapshots after a specific amount of time, eliminating the need for manual clearing. When tailored to match a use case, leveraging this method can provide a good balance between snapshot retention and deletion.
📌 Use Case: This method enables automated snapshot cleanup, making it suitable for a set-and-forget approach, reducing the need for snapshot removal.
- Press Win + I to open Windows Settings.
- Go to Privacy & Security and then press Recall & snapshots.
- Scroll down and find Maximum storage duration.
- Select the desired snapshot retention limit according to your preference:
- 30 days
- 60 days
- 90 days
- 180 days
- Unlimited
- Close the Windows Settings app.
💡 Note: This change applies immediately, affecting future snapshot retention behavior on a per-user basis.
Method 4: Delete Windows Recall snapshots via Local Group Policy
Administrators can configure policies that control the behavior of Windows Recall to fit end-user needs.
⚠️ Important: Consider backing up your Local Group Policies when making simultaneous changes. (See ⚠️ Things to look out for.)
📌 Use Cases: This method is ideal for managing Recall and its snapshot behavior on a local machine. This can also be deployed as a Group Policy in Active Directory by leveraging the Group Policy Management Console.
📌 Prerequisites:
- Administrator privileges
- Windows 11 Enterprise or Education editions
- Local Group Policy backup
- Press Win + R, type gpedit.msc, and press Ctrl + Shift + Enter.
- Navigate the following path: Computer Configuration > Administrative Templates > Windows Components > Windows AI
- Inside Windows AI, configure these policies to manage the Recall feature:
Policy name
Description
Parameters
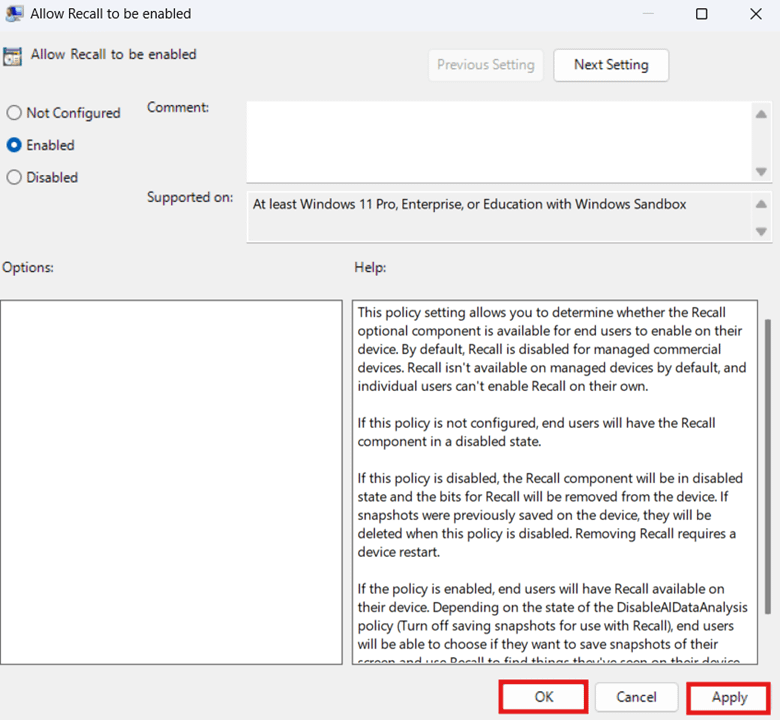
Allow Recall to be enabled Allows administrators to control whether end users can toggle Recall on their devices. This also works with compatible Windows 11 Pro devices.
- Not configured: Disables Recall for all end users.
- Disabled: Disables Windows Recall and deletes saved snapshots.
- Enabled: Provides end users with the option to toggle Recall on their device.
Turn off saving snapshots for use with Recall Allows administrators to choose whether end users can save snapshots using Recall. This also works with compatible Windows 11 Pro devices.
- Not configured: Snapshots for Recall are disabled for end users.
- Disabled: Provides end users with the choice to save snapshots and revisit pages using Recall.
- Enabled: Prevents snapshots from saving for Recall and deletes previously saved ones.
Set maximum storage for snapshots used by Recall Allows administrators to allocate a maximum amount of disk space for Recall snapshots. Once the total snapshot size exceeds the allocation, the system deletes the oldest snapshots to accommodate new ones.
- Not configured: Enables OS and end users to allocate disk space for snapshots.
- Disabled: Enables OS to automatically allocate disk space for snapshots.
- Enabled: Allows administrators to determine how much space snapshots can occupy.
Set maximum duration for storing snapshots used by Recall This policy provides control over the maximum number of days Windows retains snapshots for Recall. - Not configured: Stores snapshots until the system runs out of allocated space, deleting the oldest to accommodate new ones.
- Disabled: Allows OS to automatically manage maximum storage duration for Snapshots.
- Enabled: Allows administrators to set how long snapshots stay on a device.
- Press Apply and then OK to apply changes to a policy you want to configure.
- Exit the Local Group Policy Editor, open PowerShell, and enter the following:
gpupdate /force.
⚠️ Things to look out for
Risks | Potential Consequences | Reversals |
| Permanent deletion of snapshots. | There’s no documented way to back up snapshots, and once they are deleted, they are permanently removed locally. | Instead of deleting all snapshots, consider removing only those from a specific timeframe. |
| Can’t enforce Recall policies. | End-users can still toggle Recall via Windows Settings after configuring Group Policy. | Configure Recall policies on a system-wide level and let end-users opt in by manually toggling the feature for themselves. |
| Recall settings don’t appear in Windows Settings. | After enabling Recall system-wide, end users won’t be able to toggle it via Windows Settings. | Make sure that you have a Windows 11 Copilot+ PC, as the Recall feature is exclusively offered on this platform. |
| Not creating a Local Group Policy backup. | Reverting changes across multiple policies can be repetitive and time-consuming. | Consider backing up your Local Group Policy Editor settings before proceeding to ensure quick rollback in case of misconfigurations. |
Considerations when deleting Windows Recall snapshots
The Recall feature can help boost end-user productivity by providing easy access to visited pages. Below are key considerations you should remember and employ to help you utilize Recall effectively, especially for secure environments.
Privacy and productivity
Leverage the storage duration settings for Windows Recall to balance productivity and compliance for your environment. This provides a balance between retaining useful snapshots within a definite period without bloating your hardware with sensitive information indefinitely.
Organizational privacy standards
Administrators can opt to remove Windows Recall for environments with strict compliance policies. If disabling Recall isn’t possible, manual and scheduled cleanups should be enforced to maintain an organization’s compliance requirements.
User education
Turning on Windows Recall across an environment requires user education due to the feature’s opt-in consent requirement. For the best results, users should understand how to toggle the feature, remove snapshots, and adjust storage retention settings. Supplementing this with onboarding resources and guides helps ensure users can manage Recall in accordance with an environment’s privacy and compliance expectations.
Remove Windows Recall snapshots for endpoint compliance
Managing Windows Recall snapshots is essential for maintaining compliance with an environment’s privacy and storage policies. This guide has outlined different methods to configure Recall in a way that aligns with environment policies and user needs.
End users can manage their own account’s Recall settings through Windows 11 Settings, including deleting snapshots and adjusting storage duration. Meanwhile, administrators can configure this system-wide via the Local Group Policy Editor to ensure consistent Recall behavior across all users.
Related topics:


